With workspaces, you can organize your content into separate environments, ensuring that only the right people have access to specific content. This is especially useful when you have multiple teams working on different projects. In this article, we’ll walk you through setting up your workspaces and managing members.
⚠️ The number of workspaces you can create depends on your plan. If you’re interested in additional workspaces or want to upgrade your plan, contact us here.
In this article
Why use workspaces?
Workspaces allow you to divide your content into separate environments. Each workspace (think department, brand, or regional office) has its own environment where members can collaborate on projects. Users can only access projects in workspaces they are members of, ensuring content stays protected.

By setting up separate workspaces for each team, you can empower anyone to create content with the proper brand governance and permissions:
-
Separate environments — limit user access to only content that is relevant for them.
-
Greater level of security — determine user access with roles and permissions.
-
Ensure brand consistency — keep content on-brand with the Brand Console.
- Configure your brand governance settings — choose to allow or restrict creation of brand kits, templates, and modules in the workspaces.
There are many ways you can structure your workspaces to support the content creation process. Below are two examples:
Example 1: Workspaces by Department
A consulting firm creates separate workspaces for Marketing, Sales, and Legal. The members of each team can only access their own workspace. This ensures that someone from the Sales team cannot edit content from the Marketing team.
Example 2: Workspaces by Region
A global company creates workspaces for each regional office in New York, London, and Singapore. A Sales Enablement Manager is an admin with company-level access to create templates for all regions. Sales Reps in each region are editors in their respective workspace, where they can adapt the template to make it region-specific.
How do workspaces work?
You can navigate between workspaces by clicking the dropdown on the left panel. From each workspace, you can manage projects, brand kits, templates, etc. Users will only see workspaces they’re members of.
📖 Continue reading here for more information on what you can access from the workspace menu: All about the dashboard > workspaces

Creating a workspace
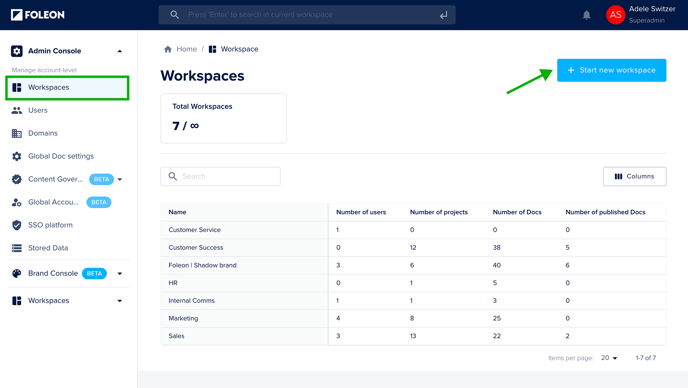
You can create a new workspace via the Admin Console.
⚠️ The number of workspaces you can create depends on your plan. If you’re interested in additional workspaces or want to upgrade your plan, contact us here.
Click Admin Console, then Workspaces on the main menu. To create a new workspace, click + Start new workspace.
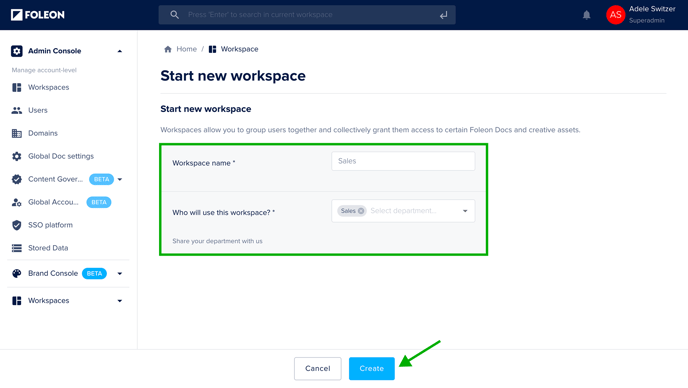
Fill out the Workspace name and the department that will use it. Click Create. Your workspace is now created!
Add and manage workspace members
Managing users across workspaces
Users can belong to multiple workspaces. Their user role determines the actions they can perform. Once you add a user to a workspace, they become members of that workspace.
Let's say you have separate workspaces for each department: Sales, Marketing, and Legal. Someone like a Sales Enablement Manager would be a member of both the Sales and Marketing workspaces:
- In the Sales workspace, they work on content to ensure sales reps have the right playbooks, training materials, and proposals.
- In the Marketing workspace, they can also collaborate with the marketing team on success stories and one-pagers.
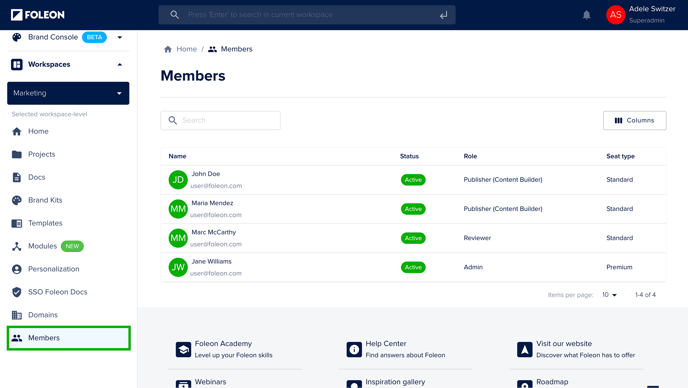
View members of your workspace
To see all members of a specific workspace, select the workspace from the dropdown list on the left panel and click Members. Here, you'll see an overview of all members, including their role, seat type, and status.
Add or remove members from your workspace
To manage a user’s membership to a workspace, you will need to edit the user.
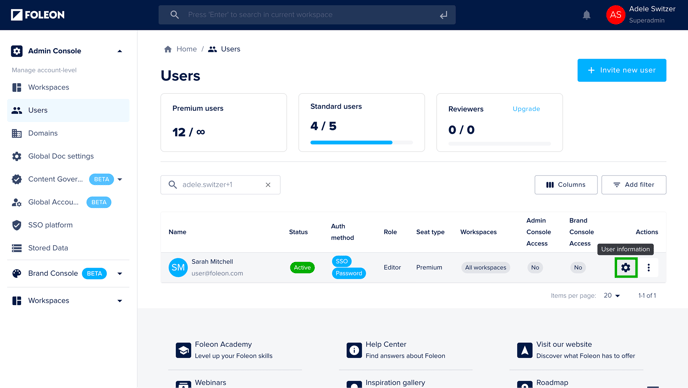
Click Admin Console, then Users on the main menu.
Hover over the user on the list and click the cogwheel icon ⚙️. Alternatively, double-click on the user to open the settings.
Under Workspaces, add or remove the user from the relevant workspaces. Once you’ve made your changes, click Save.
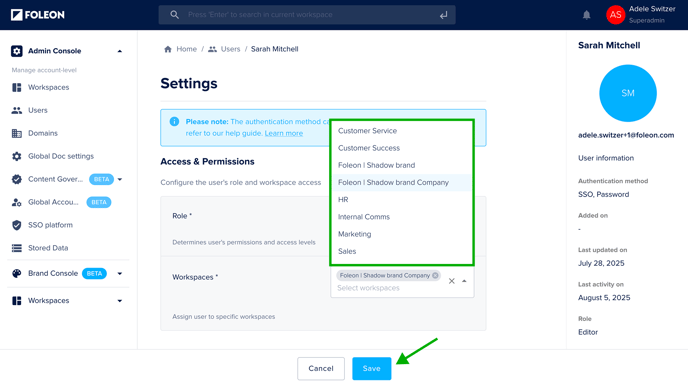
If you want to give a user access to all workspaces, assign them to the 'Company' workspace. For example, if your company name is ACME, you will see the option ACME Company.
- Admins with access to the company level will have access to the Admin & Brand Console
- Designers with access to the company level will have access to the Brand Console
💡 If you add an existing user to a new workspace, they will receive an email informing them that an admin has added them to a new workspace.
Sharing brand assets across workspaces
Share from the Brand Console
With the Brand Console, you can create and manage brand assets, such as Brand Kits, templates, and modules, all from one place and share them across workspaces. You can choose to assign these assets to one, multiple, or all workspaces.
Once assigned, these assets become available within the workspace and are clearly marked as “Brand Console” assets. Workspace users can use them in their Docs, but can't edit or overwrite them. This allows you to manage your assets from one place and ensures consistent use of your branded elements across teams.
📖 Learn more in our article: All about the Brand Console

Shared media library
You organize your images, videos, and documents in the Media Library. As an admin or designer in the main workspace, you can share specific folders across all workspaces. This ensures that all workspaces can create on-brand content while saving time
📖 Learn more in our article: All about the Shared media library

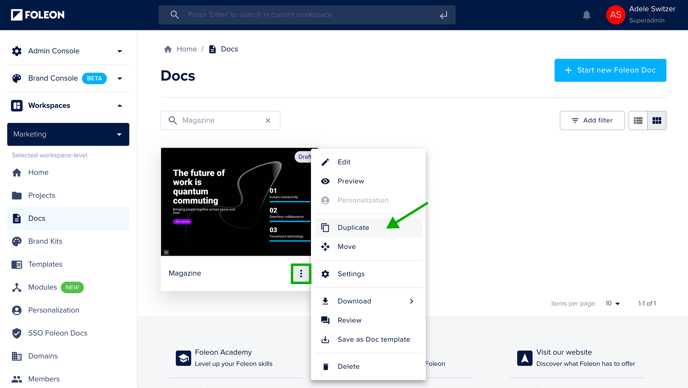
Move Docs between workspaces
It's not possible to move a Foleon Doc from one workspace to another. However, we have a duplicate feature allowing you to achieve the same goal.
You can duplicate a Doc to any workspace you're a member of. If you have access to all workspaces, you can duplicate to any workspace in your account.
⚠️ After duplicating, be sure to delete the original Doc (if needed).