Videos make your content vibrant, easier to consume, and more engaging. In this article, we show you how to work with the video element to spruce up your content.
💡 Want to learn more about background videos? Check out our article Working with background videos.
In this article
Add a video to your page
You can add a video to your page using the video element. In the elements tab on the left-hand side of the editor, drag the video element into a column.
💡When you're working with the Content Builder, it's not possible to add a video to your page. They're included in block templates.


💡Your audience can decline targeting cookies. In doing so, they also decline cookies from the video platform where your video is hosted. This results in videos being blocked. Learn more about What happens when a visitor declines cookies.
Add a new video to the media library
You can add videos to the media library at any time:
- Click +Add new media in the top-right corner of the Media Library.
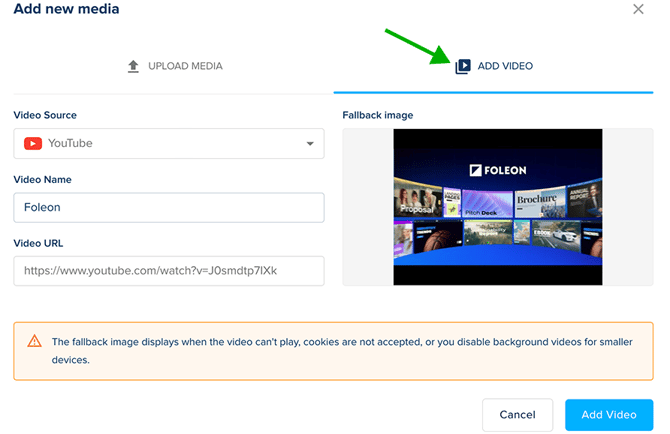
- Select the option Add Video
- Select your Video Source from the dropdown and complete the remaining information:
- YouTube - Name your video and paste the video watch URL (You can usually find this in your browser's address bar, but please review the supported format below )
⚠️ Important: To ensure your video plays correctly, a standard YouTube watch URL
- ✅ Supported format: https://www.youtube.com/watch?v=[VIDEO_ID]
- ❌ Unsupported formats:
- Do not use the Share URL: https://youtu.be/[VIDEO_ID]
- Do not use the Playlist URL: https://youtube.come/watch?v=[VIDEO_ID]&list=[LIST_ID]
- YouTube - Name your video and paste the video watch URL (You can usually find this in your browser's address bar, but please review the supported format below )
-
- Vimeo - Name your video and paste the URL from Vimeo
- Wistia - Name your video and paste the URL from Wistia
- ✅ Supported URLs:
- https://wistia.com/medias/[VIDEO_ID]
- https://[CUSTOM_SUBDOMAIN].wistia.com/medias/[VIDEO_ID]
- https://wistia.com/embed/medias/[VIDEO_ID]
- https://[CUSTOM_SUBDOMAIN].wistia.com/embed/medias/[VIDEO_ID]
- ✅ Supported URLs:
-
- Brightcove - Name your video and paste the URL from Brightcove
- ✅ Supported URL:
https://players.brightcove.net/[ACCOUNT_ID]/default_default/index.html?videoId=[VIDEO_ID]
💡 To find this URL, click 'Publish and embed' and copy the preview link
- ✅ Supported URL:
- Brightcove - Name your video and paste the URL from Brightcove
-
- Self-hosted video - These are videos you host on your own server. They should always be in MP4 format and entered as a URL, meaning the URL should always end in ".mp4." It can't be an embed code or a regular ".com" link. Name your video and paste the URL.
- Foleon-hosted video - Foleon-hosted videos let you upload video files straight into your Media Library so you don't need to rely on external platforms like YouTube, Vimeo, Wistia, or Brightcove. For more information, continue reading here.
- Adjust the fallback image if desired. The page will show the fallback image if the video doesn't play.
⚠️ When embedding videos from a third-party provider, use the direct media link rather than an iframe embed URL, which contains parameters such as:
?embedType=iframe_web_component&seo=true&videoFoam=false&videoWidth=640
⚠️ Self-hosted and Foleon-hosted videos are not available for all plans. If you're interested in these functionalities, contact us here.
💡 YouTube Shorts are not currently supported. As a workaround, drag and drop the embed element on your page and replace "shorts" with "embed" in the video's URL. Enter this URL under the iFrame embed tab.
For example, if the original URL is:
🔗 https://www.youtube.com/shorts/j8kenbdjs
Change it to:
✅ https://www.youtube.com/embed/j8kenbdjs
Every video requires a fallback image to ensure your page still looks good if the video can't play. This might happen if autoplay is blocked or the viewer declines cookies from your video platform.


Replace a video
You can replace a video by clicking the replace icon in the blue element bar. This opens the media library, where you can select a new video.

Accessible (& unbranded) video player
With our accessible video player, you can make all the video elements in your Doc more inclusive. This option improves keyboard navigation and screen reader compatibility. As a bonus, it also removes platform branding from YouTube, Vimeo, Wistia, Brightcove, and self-hosted videos!
💡 This setting applies only to video elements. Background videos remain unchanged.


Once enabled, all video elements in your Doc will automatically switch to the accessible player. The result? A sleeker, more inclusive video experience for every viewer!
Set videos to autoplay
Do you want your videos to automatically play as your audience scrolls through your page? You can enable autoplay directly in your video element settings.
Here’s how to enable autoplay:
-
Hover over the video and click the cogwheel icon ⚙️ to open the element settings.
-
Go to General settings and toggle on Autoplay.
Once enabled, your video will autoplay based on the viewer's scroll position:
-
In view? It plays. When the video is at least 50% visible on the screen, it begins playing automatically.
-
Out of view? It pauses. When the video is less than 50% visible, it pauses. Scroll back, and it resumes where it left off. Autoplay also pauses when the viewer switches tabs.
-
Muted by default. To ensure a smooth experience, autoplayed videos are muted. Viewers can manually enable audio.
-
Only one plays at a time. If multiple videos are in view with autoplay enabled, only the first video meeting the 50% threshold will play. We call this the “First in View” principle.

Element settings
You can style your video element to fit your design.
Hover over the video and click the cogwheel icon to open the element settings.

💡When working with the Content Builder, you'll have limited element settings. You can only replace videos in block templates.
General settings
From the general settings, you can turn on the toggle if you want your video to autoplay.

Border
Add a border around your video. You can apply the same border weight on all sides or adjust each side individually. All borders will use the same selected color.

Shadow
Add shadows to your video element and adjust the color, position, and blur radius.

Add extra space below the video to create distance from the next element.

Set the alignment to either left, center, or right.

Show or hide the video in desktop, tablet, or mobile view modes.

Animation
Select an entrance animation that will play when the page is opened.
