💡 The Brand Console has replaced your Shared Media Library.
⚠️ Multiple workspaces are not included in every plan. If you want to use this functionality, contact us here.
In this article
Why manage media from the Brand Console?
The Media Library in the Brand Console allows you to create a centralized asset library that can be shared across your workspaces.
Admins and Designers with access to the Brand Console can organize media into folders and decide which workspaces have access to each folder.
Instead of uploading the same logo or brand assets to every workspace, you can upload them once in the Brand Console and share them with the appropriate workspaces.
This approach helps you:
-
Maintain brand consistency
-
Reduce duplicate files
-
Ensure teams always use approved assets

Control workspace upload permissions
From the Brand Console governance settings, you can decide whether workspace users are allowed to make changes to the Media Library in their workspace.
If you disable Media Library access for workspaces, users can only use media shared with them from the Brand Console. They will not be able to upload or manage their own media.
📖 For more details, read our article: Centralized control with Brand Governance Settings
Admins and designers with access to the Brand Console can manage these settings under Brand Console > Settings.

✅ If the Media Library is enabled for workspaces:
Workspace users can:
- Upload their own media
- Create and organize folders
- Remove, move, edit, or delete workspace-owned assets
- Generate AI images (if enabled)
-
Use any assets shared from the Brand Console
💡 We recommend enabling the Media Library if you want workspace users to have flexibility to upload and manage their own media assets when creating Foleon Docs.
❌ If the Media Library is disabled for workspaces:
Workspace users:
- Cannot upload new media
- Cannot create folders
- Cannot move, rename, or delete content
- Cannot crop or edit images
- Can use any assets shared from the Brand Console
💡 We recommend disabling the Media Library if you want full control over the media used in Foleon Docs. Workspace users will only be able to use pre-approved visuals.
Share assets from the Brand Console
💡 Only Admins and Designers with access to the Brand Console can share folders with workspaces.
When you share a folder to workspaces, all its contents, including files and subfolders, are shared automatically.
To share a Media Library folder with a workspace:
-
Go to the Brand Console and open the Media Library
-
Open the quick actions menu (⋮) on the folder you want to share and select Sharing Settings

-
Choose how you want to assign access:
- Select specific workspaces, OR
- Toggle on 'Assign this resource to all current and future Workspace' to make the folder available to every workspace
- Click Save.
The folder will now appear in the Media Library of the assigned workspace(s).

You can change which workspaces have access to a folder at any time. If you remove a workspace from the list, the folder will no longer be visible to users in that workspace.
💡 Shared folders always appear in the root level of the workspace Media Library, even if they are nested inside other folders in the Brand Console.
View where folders are shared
In the Brand Console Media Library, you can see and filter which workspaces have access to each folder.
In the Brand Console Media Library (list or grid view), the sharing information is displayed next to each folder.
For example, in the image below:
- The folder "Brand Assets" has been shared with all workspaces
- The folder "Sales Media" has been shared with only one workspace
- The folder "Illustrations" has not been shared with any workspaces and is therefore not available for use by any workspace

You can also use the Workspaces filter at the top of the page to quickly find folders shared with specific workspaces.

Add media to shared folders
You can upload media to any shared folder in the Brand Console Media Library.
When you upload images, videos, animations, or files to a shared folder, they immediately become available to all workspaces that have access to that folder.

💡 For more information about uploading files, read: All about the Media Library
If you make changes to media in a shared folder, those changes are reflected for all workspaces. For example, if you rename an image in a shared folder, the updated name will also appear for workspace users.
Using media from the workspace
After you share a folder with a workspace, workspace users will see two types of folders in their Media Library.
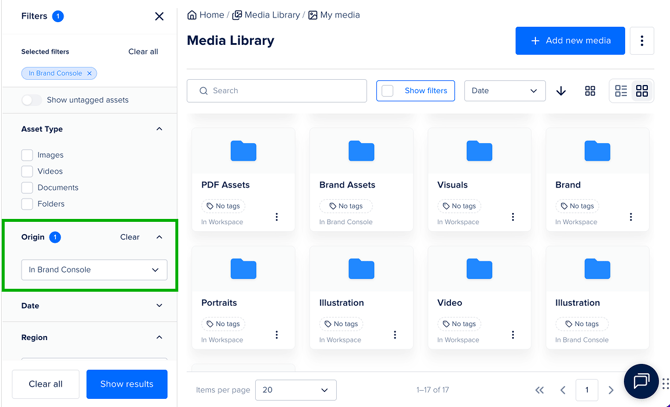
Filter in the Media Library:
Workspace users can use the Origin filter to search for folders and narrow results:
- Navigate to the Media Library.
- Click Show filters to open the Filter panel.
- Select one of the filter options under Origin:
- In Workspace — this will show only folders and media from the workspace
- In Brand Console — this will show only folders shared from the Brand Console
- Click Show results to apply your filters.
💡 When navigating inside a folder, the Origin filter is hidden because all content within that folder shares the same origin.
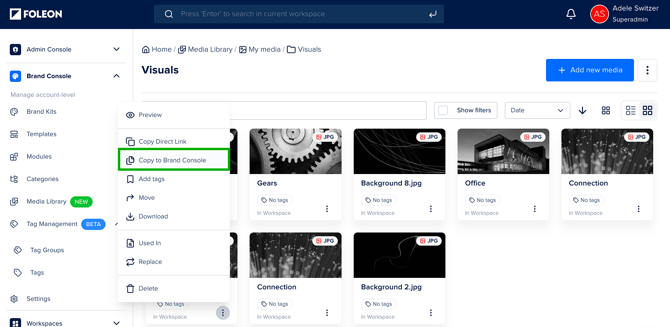
Copy assets to the Brand Console:
Workspace users can copy files from their workspace Media Library to the Brand Console Media Library. This allows teams to contribute useful assets back to the central library so they can be reused across other workspaces.
For example, a designer might upload images while creating a Foleon Doc and later copy those approved assets to the Brand Console so they are available for other teams.
💡 Users must have access to the Brand Console to copy files to the Brand Console Media Library.
- Open the Media Library in your workspace
- Open the quick actions menu (⋮) on the asset you want to share and select Copy to Brand Console
- Confirm you would like to copy the file
Each selected file is downloaded from the workspace and re-uploaded to the root folder of the Brand Console Media Library. From there, Admins and Designers can organize the files into folders and share them with workspaces.