💡 Want to learn other ways to visualize your data? Read our article Working with the data elements.
In this article
Add the table element
- Open the elements tab on the left side of your screen.
- Drag the table element into a block on your page.
- Select the number of rows and columns for your table and click Create.
When you create a new table, you can start with up to 8 rows and 8 columns. Once the table is added, you can change the number of rows and columns.
- Click on a table cell to insert data. You can input your data manually or paste from a spreadsheet.
💡When you're working with the Content Builder, it's not possible to add a table element to your page. They're included in block templates.
.png?width=670&height=366&name=Screenshot%202023-05-10%20at%2013.17.47%20(1).png)
Paste data from a spreadsheet
To create a table quickly without manual entry, paste your data directly from a spreadsheet tool like Google Sheets or Excel.
- Copy the data from your spreadsheet.
- Click into the Foleon table where you want to paste the data.
- Paste with your keyboard shortcut (Ctrl + V on Windows, Cmd + V on Mac).
You can also copy your table and paste it back into a spreadsheet.
💡 When you paste into a Foleon table, formatting like merged cells, bold, italic, underline, and links carries over. Colors and fonts don't carry over to a Foleon table, so you may need to reapply them using the formatting bar.
Structure your table
Once your table is on the page, you can adjust its layout: merge cells, choose your headers, change its size, and reorganize rows and columns.
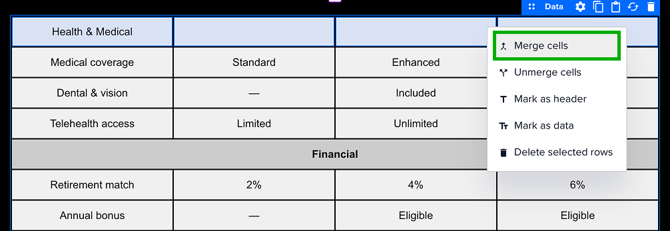
Merge cells
- Select the cells you want to combine.
- Hover over the top-right corner of any selected cell, then click the three dots (⋮).
- Select Merge cells.
💡 To split a merged cell back into separate cells, select it, open the three dots (⋮) menu, and select Unmerge cells.
Set your headers
Headers aren't limited to the top row. You can mark any cell, row, or column as a header to match how your data is actually organized.
- Select the cells you want to mark as headers.
- Hover over the top-right corner of any selected cell, then click the three dots (⋮).
- Select Mark as header.
When you mark a header outside the preset positions, the Header position setting automatically switches to custom. You can change how headers look under Style your table.
💡 To turn a header back into a standard cell, select it, open the three dots (⋮) menu, and select Mark as data.

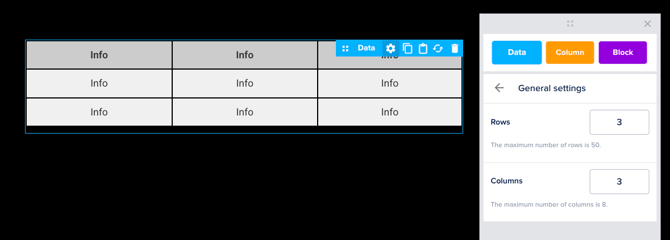
Change the number of rows and columns
- Open the element settings.
- Click general settings.
- Use the input fields to set the number of rows and columns.
💡 The maximum number of rows is 50. The maximum number of columns is 8.
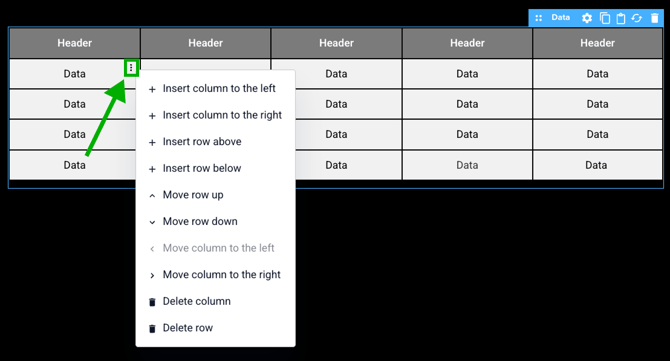
Add, delete, or move rows and columns
- Hover over the top-right corner of any cell, then click the three dots (⋮).
- From the dropdown menu, select insert, move, or delete a row or column.
Style your table
Table settings
In the table section of the element settings, you'll find different settings that let you style your table:
- Table color: Set the color for the table cells. This does not include the table header.
- Header color: Set the color for the cells marked as headers.
- Header position: Decide where your table header sits. You can choose top, top-left, left, bottom, or custom. When you mark a cell outside these preset positions as a header, it automatically switches to custom.
- Style alternates: Style alternating rows or columns with a different color.

Brand settings
You can set the default font for the table header and table cell in the brand settings. If you click on table header or table cell, the font selection bar will let you change the font.
Your font selection in the brand settings will be the default font when you add a new table in your Doc.

Text formatting
You can customize the text formatting within individual table cells to match your design.
Format a single cell
- Click inside the cell you want to edit.
- Use the formatting bar at the top of the screen to adjust the font, size, text color, and horizontal alignment (left, center, or right).
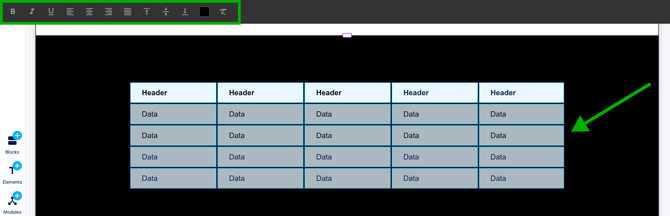
Format multiple cells
- Select the cells you want to style by clicking and dragging across them, or by holding Shift and clicking each cell.
- Use the formatting bar to adjust the font, text color, horizontal alignment (left, center, or right), and vertical alignment (top, middle, or bottom).
Other element settings
💡 When you're working with the Content Builder, you won't see these styling element settings.
Border
The border option allows you to create a complete border or a border on specific sides of your element. All sides at once is selected by default, meaning that when you increase the border thickness, the same amount of border will appear on all sides simultaneously.
When all sides at once is deselected, the option to increase the amount of the border for each side will appear. It is also possible to add more than one border. Every border will have the same color selected at the border color picker.
Spacing
Spacing can be increased to create more space between the element's border and the content within the element.
Animation
You can select the entrance animation of the element in the drop-down menu. This animation will show once when the page is opened.